Today, we’re going to talk about another home improvement care tip. Last time we’ve talked about how do you care for palm trees, and today we’re going talk about how to DIY install your own lawn.
Before laying your new turf, proper site preparation is essential. A well-prepared foundation ensures that the grass establishes strong roots, stays healthy, and grows evenly. Skipping or rushing through this stage can lead to uneven growth, poor drainage, and weak grass that struggles to thrive.
The following steps will guide you through the essential preparations for a lush, long-lasting lawn.
Stage One: Preparing the Site
STEP 1: Remove Weeds
Weeds are one of the biggest threats to a new lawn. If not removed, they will compete with your turf for nutrients, water, and sunlight. Some common weeds—such as dandelions, crabgrass, and clover—can grow aggressively and take over your lawn before the turf has a chance to establish itself.
How to Remove Weeds:
- Manual Removal: If you have only a few weeds, pull them out by hand, making sure to remove the entire root system to prevent regrowth.
- Herbicide Treatment: For larger weed infestations, apply a non-selective herbicide two weeks before laying turf. This will ensure the weeds are completely dead before you proceed.
- Solarisation Method: If you prefer a chemical-free approach, cover the area with clear plastic sheets for 4-6 weeks. This traps heat and kills weeds by depriving them of sunlight and oxygen.
It is crucial to wait at least two weeks after applying herbicide before proceeding to the next step, as herbicide residues can harm your new turf.

STEP 2: Soften the Soil
Once the weeds are removed, you need to prepare the soil to support root growth. If the soil is compacted or too hard, grass roots will struggle to penetrate and spread. This can lead to patchy growth and poor water retention.
How to Loosen Soil:
- Use a rotary hoe or garden fork to aerate the top 10-15 cm of soil.
- If the soil is clay-heavy, add gypsum to improve drainage.
- For sandy soils, mix in organic matter such as compost to retain moisture.
Proper soil aeration helps your new lawn establish quickly and prevents water from pooling on the surface.
STEP 3: Plan for Pathways & Driveways
Before you move forward, take a moment to map out any pathways, driveways, or garden beds near your new lawn.
Why is this important?
- Defining edges early prevents grass from growing into unwanted areas.
- Installing garden edging or pavers creates a clean, professional finish.
- Separating turf from driveways prevents damage from vehicle traffic.
You can use metal, stone, or plastic edging to create clear boundaries. If you’re planning a stepping-stone path, install it before laying the turf to avoid disturbing the new grass later.
STEP 4: Add Topsoil
Topsoil plays a critical role in helping your turf develop strong roots. If your existing soil is poor-quality or lacks nutrients, spreading fresh topsoil can significantly improve growth.
How Much Topsoil Do You Need?
- Spread 5-10 cm of sandy loam or rich organic soil across the area.
- Ensure the soil is free from rocks, debris, and clumps that could affect turf growth.
- Rake the soil evenly to create a smooth surface.
Using high-quality topsoil reduces the risk of poor drainage and weak root development, both of which can lead to patchy grass growth.
STEP 5: Improve Soil Quality
If your soil lacks nutrients, now is the time to enrich it. Healthy soil leads to a healthy lawn, so this step should not be overlooked.
Soil Improvement Tips:
- For Nutrient-Rich Soil: Add compost, aged manure, or organic fertilisers to boost soil health.
- For Clay Soils: Mix in sand and gypsum to improve drainage and prevent compaction.
- For Sandy Soils: Incorporate organic matter to help retain moisture.
Use a rake or rotary hoe to mix these amendments into the top layer of soil, ensuring even distribution.
STEP 6: Level and Spread the Soil
Uneven soil can cause water pooling in some areas while leaving others too dry. Leveling the ground ensures your lawn grows evenly and looks smooth.
How to Level Soil:
- Rake the soil to distribute it evenly.
- Use a lawn roller or flat board to compact the surface slightly.
- Check for dips or bumps and adjust by adding or removing soil.
Avoid over-compacting the soil, as this can make it harder for the grass roots to penetrate. The goal is a firm but slightly loose surface to promote strong root development.
STEP 7: Apply Starter Fertiliser
A good-quality starter fertiliser helps your turf establish strong roots quickly. This step gives your lawn the essential nutrients it needs to thrive.
Which Fertiliser Should You Use?
Look for fertilisers with:
- Phosphorus (P): Supports root growth.
- Potassium (K): Strengthens the grass against stress.
- Nitrogen (N): Helps with initial leaf growth (but should be applied in moderation).
How to Apply Fertiliser:
- Spread the fertiliser evenly across the prepared soil.
- Lightly rake the soil to incorporate the fertiliser without burying it too deep.
- Water the area lightly to help the nutrients absorb into the soil.
Applying fertiliser before laying turf ensures that the nutrients are already in place when the roots begin to grow.
Final Check Before Laying the Turf
Before you move on to the next stage, take a moment to inspect your prepared site:
- Are all weeds removed? (No visible weeds or roots left behind.)
- Is the soil aerated and loose? (At least 10-15 cm deep.)
- Have pathways and garden edges been planned?
- Is topsoil spread evenly, with no large rocks or debris?
- Is the surface level and compacted just enough?
- Has fertiliser been applied evenly?
Once all these steps are complete, your lawn is ready for turf installation!
Why Preparation Is Essential
Taking the time to properly prepare your site ensures that your turf will establish quickly and grow into a healthy, green lawn. Poor preparation can lead to weak grass, uneven growth, and costly repairs later on. By following these steps, you set the foundation for a long-lasting, beautiful lawn that enhances your outdoor space.
Now that your site is ready, it’s time to move on to Stage Two: Laying the Lawn!

Stage Two: Laying the Lawn
Now that you’ve properly prepared the soil, it’s time to lay your turf and bring your lawn to life.
This stage requires careful attention to placement, watering, and early maintenance to ensure the grass takes root and grows into a lush, healthy lawn.
Follow these steps for a successful lawn installation.
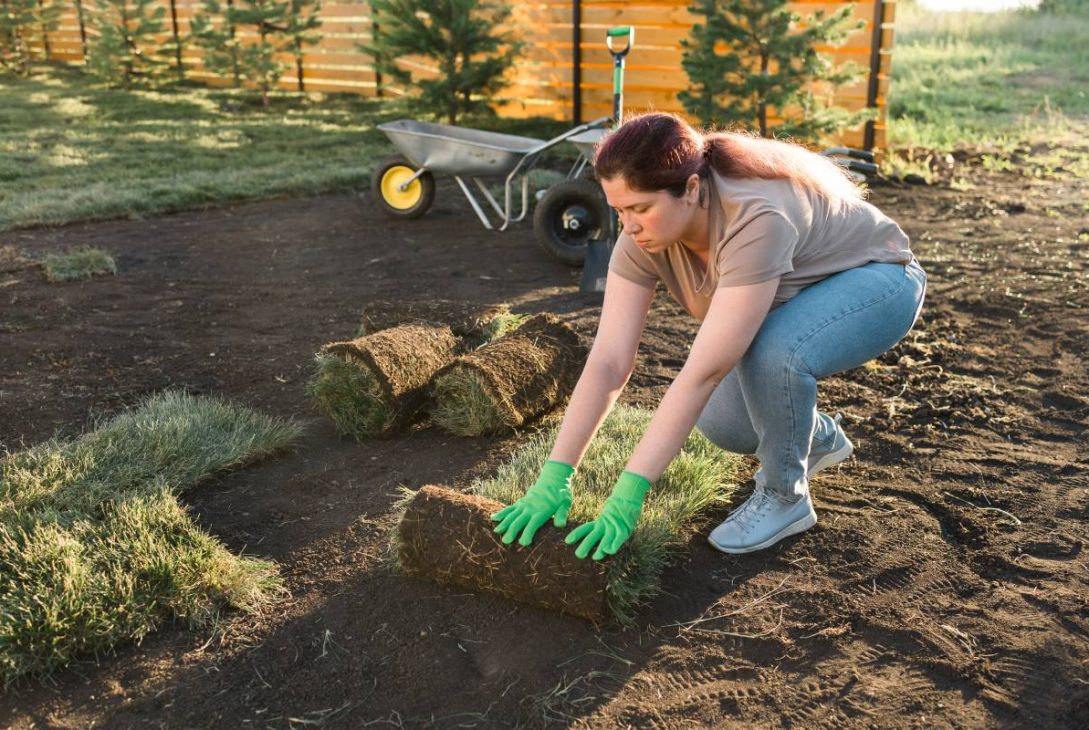
STEP 8: Laying the Turf Rolls
Laying turf is similar to placing puzzle pieces—you want a seamless, even finish with no visible gaps. Follow these guidelines to lay your turf properly:
1. Start from a Straight Edge
Begin laying the turf from a fixed straight edge, such as along a pathway, garden bed, driveway, or fence. This provides a structured starting point and makes it easier to align the turf rolls evenly.
2. Lay Turf in a Staggered Pattern
Just like laying bricks in a wall, turf should be laid in a staggered or offset pattern. This means aligning the edges of the turf rolls like a checkerboard rather than in straight rows. This technique:
- Prevents visible seams.
- Encourages stronger root bonding.
- Reduces soil erosion and shifting.
3. Place Turf Rolls Tightly Together
Gaps between rolls can lead to weed growth and uneven settling. Make sure each roll is butted tightly against the next without overlapping. Gently press the edges together to create a uniform lawn without visible seams.
4. Trim Excess Turf for a Neat Fit
When you reach garden edges, curves, or obstacles like trees and paving stones, use a sharp knife, garden shears, or a spade to carefully trim the turf to fit snugly. Avoid cutting too small, as gaps will create uneven growth over time.
5. Firmly Press the Turf Into the Soil
Once the turf is laid, walk lightly across it or use a roller to press it into the soil. This step ensures that the grass roots make direct contact with the ground, which is essential for root establishment and healthy growth.
6. Avoid Walking on Freshly Laid Turf
Try to avoid stepping on the newly laid lawn for the first few weeks, as this can cause indentations and disrupt root growth. If you must walk across the turf, place wooden planks or stepping stones to distribute your weight evenly.
STEP 9: Watering Your New Lawn
Proper watering is crucial in helping your new turf establish strong roots. Grass requires moisture, but overwatering or underwatering can lead to poor growth. Follow these watering guidelines to give your lawn the best start:
Day 1: Immediate Deep Watering
As soon as all the turf is laid, water it thoroughly. The goal is to soak both the turf and the soil beneath it, ensuring good hydration. The water should penetrate at least 10 cm deep.
First Two Weeks: Frequent Watering
- Morning and late afternoon: Water the lawn twice daily, especially in hot or dry weather.
- Keep the soil consistently moist: The turf needs constant hydration to develop roots in the soil.
- Avoid waterlogging: While the turf should be wet, excessive pooling of water can drown the grass and cause fungal issues.
After Three Weeks: Gradual Watering Reduction
- Reduce watering to once every two to three days.
- Monitor the grass—if it begins to turn dry or pale, increase watering slightly.
- Once the roots have established, deep watering less frequently is better than shallow watering daily.
Signs of Proper Watering:
- Turf feels cool and moist when touched.
- Grass stands upright and doesn’t wilt.
- Roots begin anchoring into the soil after two to three weeks.
Signs of Overwatering:
- Mushy, spongy turf that easily pulls up.
- Pools of water sitting on the surface.
- Fungal growth or discoloration.
Signs of Underwatering:
- Turf turning brown or shrinking at the edges.
- Soil cracking or feeling dry beneath the grass.
- Grass blades curling or appearing limp.
STEP 10: Enjoy Your New Lawn!
Once your turf has been laid and properly watered, you’re well on your way to having a lush, green lawn. However, there are a few final steps to ensure long-term success.
1. Allow Time for Root Establishment
It typically takes four to six weeks for the roots to anchor firmly into the soil. During this period:
- Avoid heavy foot traffic on the lawn.
- Keep watering regularly as needed.
- Check for any uneven areas or lifting edges.
2. First Mow: When and How?
Your first mow should happen once the grass reaches about 7-8 cm in height. Use a high mower setting and only remove one-third of the grass blade height to avoid shocking the lawn. Make sure your mower blades are sharp to prevent tearing the turf.
3. Fertilise for Continued Growth
About six weeks after laying the turf, apply a balanced lawn fertiliser. Look for a mix containing nitrogen, phosphorus, and potassium to promote strong root development and lush green growth. Fertilising every six to eight weeks will keep your lawn healthy and vibrant.
4. Prevent and Control Weeds
New lawns are susceptible to weeds, especially if gaps form between turf rolls. To control weeds:
- Hand-pull any visible weeds early.
- Apply a selective herbicide if necessary (but avoid using harsh chemicals on young grass).
- Maintain a dense, thick lawn by regular mowing and fertilising—this naturally crowds out weeds.
5. Aerate the Lawn for Stronger Growth
Over time, the soil beneath your lawn can become compacted, restricting water and nutrient absorption. Aerate the lawn every six months by using a garden fork or aerator tool to create small holes in the soil. This allows better oxygen, water, and fertiliser penetration, resulting in a healthier lawn.
6. Enjoy Your Beautiful Lawn!
Now that you’ve followed all the steps, it’s time to sit back and enjoy the results. A well-maintained lawn:
- Enhances your home’s curb appeal.
- Provides a soft, safe space for children and pets.
- Increases your outdoor living space for relaxation and entertainment.
Final Thoughts: DIY vs. Hiring a Professional
Creating a beautiful lawn through a DIY turf installation can be a rewarding experience. By carefully preparing the site, laying the turf correctly, and maintaining it properly, you can achieve a lush, green outdoor space that enhances your home. DIY turfing allows you to save money and take pride in your work, but it does require time, effort, and attention to detail.
However, for those who lack the time, tools, or expertise, hiring a professional landscaping service can be a smarter choice. Professionals ensure the job is done quickly and correctly, preventing costly mistakes such as poor drainage, uneven turf, or inadequate soil preparation.
If you’re dealing with complex landscaping issues—such as large tree roots, sloped surfaces, or stubborn soil conditions—working with experts like A View Turf in Sydney can make all the difference.
Whether you go the DIY route or seek professional assistance, the key to a successful lawn is proper preparation and long-term care. Invest in your turf wisely, and you’ll enjoy a vibrant, healthy lawn for years to come!